Introduction
First of all, Themesflat thank you for choosing to buy our theme!
In this document, we provide all kinds of good information with all the details you need to use our theme. It is recommended you read it thoroughly to fully leverage the Luminor theme's capabilities. Please also make sure to check out our Video Tutorials as they explain everything covered in here in greater depth. We hope you have fun and enjoy working with our theme!
- Theme version: 1.0.0
- Created date: January 15, 2026
- Update date: January 15, 2026
- Author: Themesflat
In order to ensure a smooth and easy working experience with Luminor, we have created a complete user manual. However, if you have
any issues that go beyond the scope of this guide or are having problems with our theme, we will be happy to help! Please contact
us via our helpdesk or email and we will respond as soon as possible! Thank you so much for purchasing our theme!
Email: helpdeskthemesflat@gmail.com
Create ticket id : https://themesflat.ticksy.com/
Getting Started
Requirements
- PHP 8.0 or higher
Recommended
Required must have
- upload_max_filesize = 512M
- post_max_size = 516M
- max_execution_time = 300
- max_input_time = 300
- memory_limit = 512M
Besides, need more
- Elementor
- Contact Form 7
- TF Real Estate
- One Click Demo Import
- MC4WP: Mailchimp for WordPress
- Redux Framework
Wordpress Information
To install this theme you must have a working version of WordPress already installed. If you need help installing WordPress, follow the instructions in WordPress Codex. Below are all the useful links for WordPress information.
- [WordPress Codex] - General info about WordPress and how to install on your server.
- [First Steps With WordPress] - General info about multiple topics about WordPress.
- [FAQ New To WordPress] - The most popular FAQ’s regarding WordPress.
Theme Installation via WordPress
After purchase and download we have file themename.zip. Continue we need to extract files. You will find 3 folders: 1. theme, 2. theme-child, 3. documentation.
Please follow the steps below to install the theme.
Watch the video One Click Install Demo
Install by WordPress Theme Manager
This is probably the simplest way for most users. Here are the steps you need to take:
-
Step 1 - Login to your WordPress Dashboard.

-
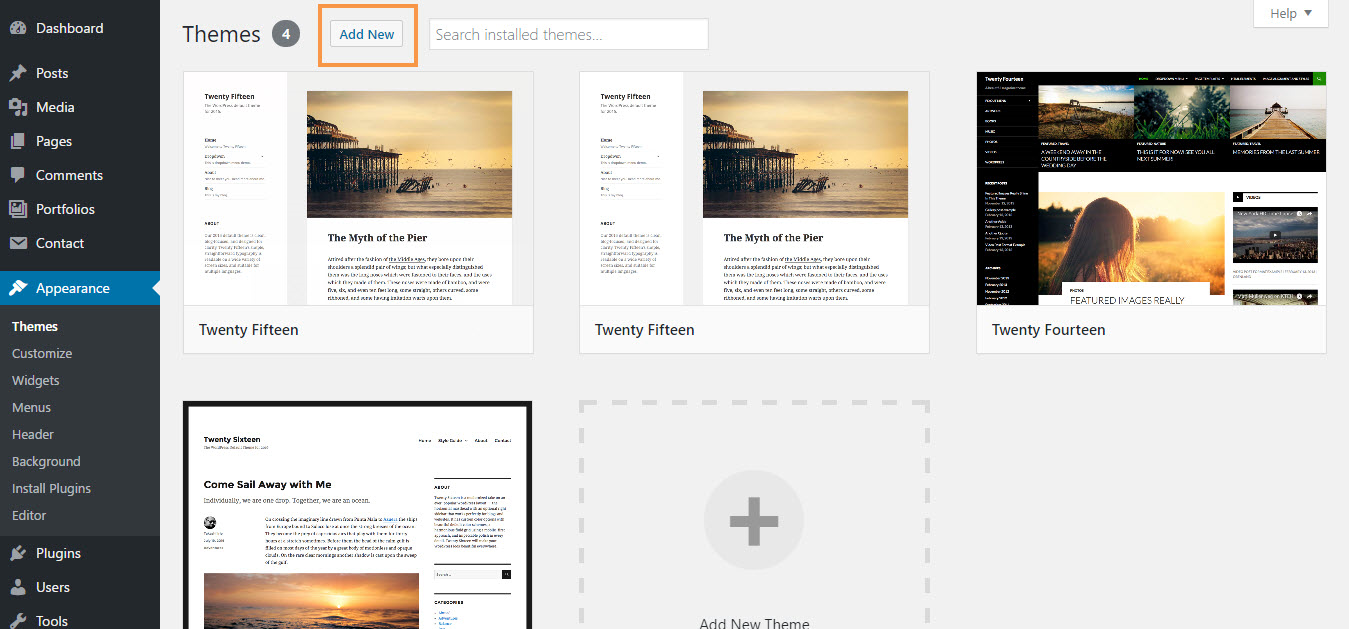
Step 2 - Go to Appearance → Themes. Then click Add New button at the
top of the screen.
-
Step 3 - Click on the Upload button at the top.

-
Step 4 - Click Choose File and select the
themename.zipfile.
-
Step 5 - Click Install and wait a moment.

-
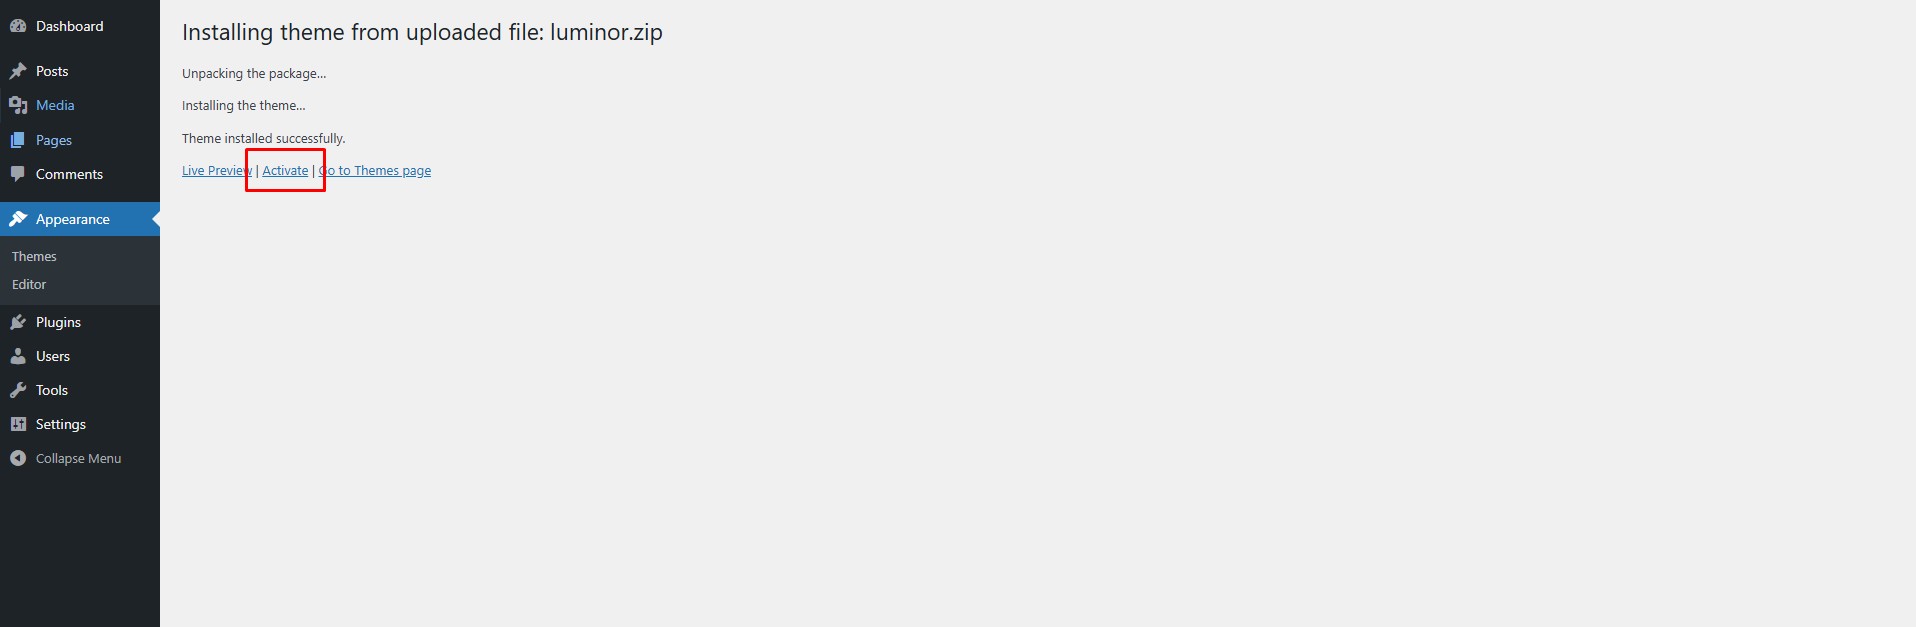
Step 6 - Once installed, click Activate to enable the theme.
-
Step 7 - A notice will appear at the top of the dashboard. Click Begin installing
plugins.
The theme requires these plugins: Contact Form 7, Elementor, Themesflat Core, One Click Demo Import, MC4WP: Mailchimp for WordPress, TF Real Estate, Redux Framework.
Recommended: Classic Widgets.
-
Step 8 - Go to Dashboard → Appearance → Install Plugins. Check all required plugins and
activate them.


-
Go to Appearance → Import Demo Data

-
Click Continue & Import
And Wait


After installing the Main theme, if you want to use the Child theme, please install it the same way as above.
Install through FTP upload
If you want to install via FTP, here are the steps:
- Using an FTP client, login to your server.
- Navigate to the
/wp-content/themes/directory. - Upload the Luminor theme folder into that directory.
Once installation is complete, your Luminor theme will be ready to use.
Theme Option
To start customizing the theme, in the Admin page please go to Dashboard > Appearance > Customize.

Please remember to click Save & Publish after customizing to save changes.
These are global settings, so they affect the entire site. However, they can be overridden per post or page.
General
-
Preloader & Social
To customize the theme, navigate to: Dashboard → Appearance → Customize → General → Preloader & Social
- Enable Smooth Scroll: Toggle smooth scrolling on or off.
- Enable Preload: Show a preloader while navigating between pages.
- Go To Top Button: Enable or disable the "Back to Top" button for user convenience.
- Social Media: Where you can add link social

-
Site Identity
To customize the theme, navigate to: Dashboard → Appearance → Customize → General → Site Identity
- Site Title: Set or update your website’s title.
- Tagline: A short description that summarizes your site.
- Site Icon: The icon that appears in browser tabs, bookmarks, and WordPress mobile apps.

-
Homepage Settings
To customize the theme, navigate to: Dashboard → Appearance → Customize → General → Homepage Settings

Header
To set up the default Header Style, navigate to Dashboard → Appearance → Customize → Header.
Custom Logo

Upload Your Logo: Drag or select your new logo.
Upload Logo for Mobile: Drag or select your new mobile logo.
Logo Size: Choose the desired logo size.
Navigation

Header Options

Header Style: Select a default header style.
Header Absolute: Enable or disable absolute positioning.
Header Sticky: Enable or disable sticky behavior for the header.
Header Login/Register: Enable or disable login/register links.
Header Button: ON | OFF the Header Button & Attach link for button
Mobile Information: Where you can change the Mobile nav bottom information.

Page Title & Breadcrumb
Page Title Style
To customize the page title layout, go to Dashboard → Appearance → Customize → Page Title → Page Title.

Use the available settings to adjust the page title style:

Breadcrumb
Enable Breadcrumbs: Show or hide breadcrumb navigation.

Breadcrumb Prefix: Text displayed before the breadcrumb trail.
Breadcrumb Separator: Character used to separate breadcrumb items.
Typography & Color
To customize typography settings, go to Dashboard → Appearance → Customize → Typography & Color.
Primary Color
To customize the page title style layout, please navigate to Dashboard → Appearance → Customize → Typography & Color → Primary Color.

Header Color
To customize header colors, go to Dashboard → Appearance → Customize → Typography & Color → Header.

Body Font
Customize the font family, size, weight, and color for body text.

Blockquote Typography

Menu Font
Customize the font family, size, weight, and color for the main menu and submenus.

Submenu:

Heading Font
Adjust the font settings for all heading levels (H1–H6).

Footer
To edit the default footer, navigate to Dashboard → Appearance → Customize → Footer.

-
Footer
You can customize the top of the footer or turn it off.

-
Menu Footer
Go to Dashboard → Appearance → Widgets to edit the footer menu.

-
Bottom
You can edit the contents of the bottom section here.

TF Real Estate
Luminor includes Eight (8) plugins that need to be installed and activated.
When you install Luminor, you will receive a notification message in your WordPress admin informing you of the required and recommended plugins. Alternatively, you can go to Dashboard → Plugins to install the theme-required plugins.

Required Plugins
- TF Real Estate – Functionality: Theme core functionality plugin. Make sure this is always installed and activated.
- Themesflat Core: The theme's components.
- Redux Framework: Provides Theme Options.
- One-Click Demo Import: Required to import a demo.
- Elementor Page Builder: Free and premium page builder plugins created by Elementor.com.
- MailChimp for WP: Helps you grow your Mailchimp lists.
- WP Mail SMTP: Reconfigures the wp_mail() function to use Gmail/Mailgun/SendGrid/SMTP instead of the default mail() and provides an options page to manage the settings.
- Contact Form 7: Contact form plugin.
ThemesFlat Real Estate Options
ThemesFlat Real Estate Options are included in the theme, so these are required plugins. You need to install and activate these plugins if you want to have the full Luminor features.
You can override templates of the Real Estate plugin on your website, such as: Map Services, Property Listing, Single Property, Agent Listing, Agent Details, Agency Listing, Agency Details, and other features like building Search Forms, etc.
1.General Options
Choose which services to use for displaying maps.


Don’t forget to click Save Changes after setting up.
2.Setup Page Options
In the Setup Page panel, you can specify the page that the user is directed to upon access (default pages). You can choose from prepared pages in our demo data or create a new page.

3. Property Options
Properties are a crucial part of a Real Estate website. The Property panel contains all options where you can set up additional information and settings.

Add Property Panels Manager
Manage (show/hide or re-order) fields for the Add/Edit Property page.


Single Panels Manager
Manage (show/hide or re-order) fields for the Single Property page.


Related Properties
Set up properties related to the single property being viewed.


Price Format
Customize everything related to property price and currency. You can insert default values such as currency sign, thousand/decimal separator, etc.

Show Property Fields
Select which fields you want to display on the Add Property page.

Required Property Fields
Select which fields you want to require from users on the Add Property page.

4. Additional Fields
The Additional Fields panel provides custom options where you can set up extra property information using custom fields.
In Property Detail Fields, you can add more custom additional fields for property details.

- Label: Name of the Property Field.
- Field Type: Choose a format from the list to organize the field layout: Text / Text Multiple Line / Select / Checkbox List / Radio.
Click Save Changes after completing the setup. You can then add extra information via the Admin Dashboard or User Dashboard.
Admin Dashboard

User Dashboard

5. User Options
Helps administrators manage user accounts by empowering users to manage their online presence both personally and corporately. You can choose whether they can submit properties, register as agents, and whether they are automatically approved after registering as agents. All of this provides powerful self-service features to streamline your business.

| Attribute | Description |
|---|---|
| Show Demo Account | Enable or disable showing a demo account on the login form. |
| Users can register to become agents? | If enabled, users can register as agents independently. |
| Automatically approve users as agents? | Allow users to become agents without administrator approval. |
| Enable Login & Register Popup | Toggle the visibility of the Register tab on the login popup. |
| Default User Avatar | Upload or select a default avatar. If a user doesn’t upload one, this avatar will be shown. |
Google Login
Google Login allows users to sign in to the website using their Google account without creating a separate account on the site.

In the Google Login panel, enable Google Login and configure the following:
- API Key: Insert your API Key.
- Client ID: Insert your Client ID.
- Client Secret: Insert your Client Secret.
How to Create a Google API Console Project
- Go to the Google API Console.
-
Select an existing project from the list, or click NEW PROJECT to create a new one:
- Enter the Project Name.
- Under the Project Name, the Google API Console automatically creates a Project ID. Optionally, you can change this Project ID using the Edit link. The Project ID must be unique worldwide.
- Click CREATE and the project will be created within a few seconds.
-
Select OAuth consent screen from the left navigation panel and configure the settings:
- Set User Type to External, then click CREATE.
- Provide app information, then click SAVE AND CONTINUE.
- You can skip the Scopes settings, then click SAVE AND CONTINUE.
- In the Test Users section, add Gmail addresses. While the publishing status is set to “Testing,” only test users can access the app.
- Click SAVE AND CONTINUE.
-
Select Credentials from the left navigation panel, click
CREATE CREDENTIALS, and choose OAuth client ID.
- In the Application type section, select Web application.
- In the Authorized redirect URIs field, enter the redirect URL.
- Click CREATE.
- In the Test Users section, add Gmail addresses. While the publishing status is set to “Testing,” only test users can access the app.
- Click SAVE AND CONTINUE.
NOTE: You can check the detailed guide on Google Application here: Create Google API Console Project and get Client ID & Client Secret .
Show Profile Fields & Required Profile Fields

Here you can choose which fields to display or require on the My Profile page.

6. Package Options
Here you can set up the currency sign and its position for your package.


7. Payment Options
The Payment panel contains all options where you can set up payment methods.

Currency Code for Payment
Provide the currency code that you want to use for payments.
PayPal Settings
- Enable PayPal: Enable or disable PayPal. If disabled, all PayPal settings below will disappear immediately.
- PayPal API: Update PayPal settings according to API type selection (two options are available: Sandbox = test API, Live = real payments API).
- PayPal Client ID: Insert your PayPal Client ID.
- PayPal Client Secret Key: Insert your PayPal Client Secret Key.
NOTE: To get your PayPal Client ID and Secret Key, see the guide here: How to get PayPal Client ID and Secret Key .
Stripe Settings
- Enable Stripe: Enable or disable Stripe. If disabled, all Stripe settings below will disappear immediately.
- Publishable Key: Insert your Stripe Publishable Key.
- Stripe Secret Key: Insert your Stripe Secret Key.
NOTE: For Stripe Publishable Key and Secret Key, see the guide here: How to get Publishable Key and Secret Key .
Wire Transfer Settings
- Enable Wire Transfer: Enable or disable Wire Transfer. If disabled, all Wire Transfer settings below will disappear immediately.
- Wire Transfer Information: Provide details such as Bank Account Information, Bank Name, etc. for transfers.
Payment Completed Settings
Configure the title and alert message displayed after a payment is completed.
8. Invoice Options
The Invoice Options panel allows you to insert extra information into invoices.

9. Search Options
This panel contains all settings where you can configure Search Options, including Search Fields, Search Form options, and Advanced Search Page options.


Sort and Show Advanced Search Fields
Here you can re-order or show/hide the default fields.

10. Compare Options
You can enable or disable property comparison and choose which fields to hide when comparing properties.

11. Favorite Options
You can enable or disable the Favorite Options here.

12. Comment & Review
You can enable or disable the Comment & Review feature here.

13. Email Templates
Here you can customize User Emails and Admin Emails for each subject, such as New Registered User or Approved Agent.

14. Archive Property
Here you can customize your Archive Property Page and Single Property Page exactly as you want on the frontend.

Card Property
Here you can enable or disable the fields/sections you want to display on the Listing Card.


15. Global Custom Section
In addition to the default sections provided in Property Details, such as Overview, Address, and Features, you can add more sections to provide additional details for your listing.
The Global Custom Section applies to all properties.
In the Single Property panel, simply add a title for the section and its content.

NOTE: If you don't see the Custom Section in property details after updating, navigate to the Property Options tab in the TF Real Estate plugin.

In the Single Property Panels Manager section, click the eye icon for Personal Custom Section / Global Custom Section to show them, then click Save Changes.

16. Archive Agent
Here you can set up the Archive Agent Page and Single Agent Page to display on the frontend as you prefer.

17.Agency Listing
Here you can set up the Single Agency Page.

18. WP Mail SMTP Settings
Go to: Dashboard → WP Mail SMTP → Settings and fill in the information form.

You can visit the WP Mail SMTP Plugin page for further details.
Add A New Property
Add a New Property from the Admin Panel
Navigate to Real Estate → Add New Real Estate in your left sidebar. The Property section in your admin panel includes the following areas:

1. Property Title
Add a title name for your property.

2. Poster
Locate the Featured Image box in your right sidebar. The Featured Image is a WordPress theme feature that allows you to upload the Poster Image of your property. This image will be displayed on listing pages, search result pages, etc.
To add a featured image, click on Set Featured Image inside the featured image box.

3. Property Description
Locate the Visual Content Editor, which allows you to easily create, edit, and format your property content. Use the editor to enter all property description content.

4. Property Information
- Basic Information: Add data such as sale price, area size, number of beds, etc.
- Location Map: Use the Map tab to add the property address.
- Floor Plans: Use the Floor Plans tab to add unlimited floor plan details.
- Gallery Images: Use the Gallery Image tab to upload property gallery images.
- Attachments: Use the Attachments File tab to upload files.
- Property Video: Use the Property Video tab to upload a video.
- Virtual Tour: Use the Virtual Tour tab to embed code from services such as matterport.com.
- Agent: Use the Agent tab to assign an agent to the property.


5. Property Type
Select the property type from the Property Type box in the right sidebar.

6. Property Status
Select the property status from the Property Status box in the right sidebar.

7. Property Features
Select the property features from the Property Features box in the right sidebar.

8. Property Country
Select the property country from the Property Country box in the right sidebar.

9. Property Province/States
Select the property province/states from the Property Province/States box in the right sidebar.

10. Neighborhood
Select the property neighborhood from the Property Neighborhood box in the right sidebar.

Don't forget to click Publish to make the property public.

Property Country, States, Province, and Neighborhood
How to Add a Country
Go to Real Estate → Country in the left sidebar and select Country.

Don't forget to click Save Changes after setting up.
How to Add States/Provinces
Go to Real Estate → States/Provinces in the left sidebar.

How to Add a Neighborhood
Go to Real Estate → Neighborhood in the left sidebar.

Property Type
Real estate listings include property type fields to describe the kind of property for sale. You can create different property types based on your needs. For example, you can assign the type Apartment or Single Family Home to a property.
Go to Real Estate → Property Type in the left sidebar.

Don't forget to click Add New Property Type after setting up.
Property Status
Real estate listings include property status fields to describe the status of a property. You can create different property statuses based on your needs.
Go to Real Estate → Property Status in the left sidebar.

Don't forget to click Add New Property Status after setting up.
Property Features
Real estate listings include property feature fields to describe the features they offer. You can create different property features based on your needs.
Go to Real Estate → Property Features in the left sidebar.

Don't forget to click Add New Property Features after setting up.
Property Label
You can add different property labels to better differentiate your properties. Property Labels will be displayed on the property image in the listing page and in property visual composer modules.
Go to Real Estate → Property Label in the left sidebar.

Don't forget to click Add New Property Label after setting up.
Agents & Agencies
Add New Agency
Go to Agents → Agency in the left sidebar to add a new agency.

Agency Sidebar
Go to Appearance → Widgets and locate the Agency Sidebar box as shown in the image below.

On the left side of the page, you will see the Available Widgets. On the right side, you can find the Agency Sidebar, where you need to drag and drop the widgets you want to display on the Agencies page.
Add New Agent
Go to Agents → Agents in the left sidebar to add a new agent.

Agents Sidebar
Go to Appearance → Widgets and locate the Agents Sidebar box as shown in the image below.

On the left side of the page, you will see the Available Widgets. On the right side, you can find the Agents Sidebar, where you need to drag and drop the widgets you want to display on the Agencies page.
User Dashboard
Login & Register
Clients can create their own account by using the signup form.


If you do not have an account yet, you need to register.

Logout: The logout option allows the user to log out.

Profile Management
Users can manage their account profile by clicking on their account name at the top of the page, then selecting the My Profile tab.

With the User Profile Dashboard, users can register and apply to become an agent, manage their properties from the frontend, communicate with buyers, control their public profile, and more.
The information in these profile categories is used not only to identify you in the system but also to share information with other users. Site administrators have complete control over the agent and property approval processes. You can register to Become an Agent in section (2) and also Change Password in section (3).
After modifying any of the fields on this page, click Save & Update at the bottom of the page.


Register to Become an Agent
An agent (real estate broker) is a person who acts as a middleman between sellers and buyers of real estate. Depending on whether they work for the buyer or the seller, agents have various responsibilities. They look for sellers who want to sell and buyers who want to buy, and they work entirely on commission.

Note:
- In the User Account panel under Real Estate Options, the admin can enable or disable the option "User can register as agent".
- If the User Account panel is set to automatically approve after registration, the account will be enabled as an agent immediately after the user completes the form. If this option is set to No, new accounts will not be accepted as agents until the administrator approves them.
Users need to wait before becoming an agent.

Once the user becomes an agent, their profile will look like this:

Add New Property
There are two ways for users to add a new property.

Here is the Add New Property page displayed on the website for users. All you need to do is fill in the information for your new property and then click Add Property.


After successfully creating a new property, you will be directed to the My Property page and receive a notification as shown below:

Or like this (if the administrator has set Automatically publish the submitted property):

Property Management
It displays all properties of the user. You can edit or delete published properties.

My Favorite
You can add any property to your Favorite list and remove it by clicking the Favorite button.


You can manage your Favorite list by adding more properties or removing them. If a property belongs to your Favorite list, the icon on the button will have a different color compared to other areas.


Compare Property
This tool allows users to compare two or more properties based on their basic criteria.
Click the Compare button on each property you want to compare. It will immediately appear in the Compared list on the right side of the screen.

Then click the Compare button in the Compared list.

My Package
- Expiration Date: The date on which the package can no longer be used. After the expiration date, users cannot submit new properties or edit published ones.
- Property Listing: The number of properties submitted.
-
Pay with PayPal: You will be redirected to the PayPal checkout page to confirm your payment.

-
Wire Transfer: You need to transfer the money.
Once the administrator confirms your payment through the Order Number, they will approve your account with the purchased package and send a verification email.

Get Package
In the User Dashboard, go to My Package.

Click the Upgrade button to buy a package. Depending on the administrator’s configuration, users may be required to purchase a package. Each package includes an expiration date, property number, featured listings, and other options relative to the amount paid. The package list is shown below:


Click the Get Started button to choose the package that best suits your needs.
Payment Method
After selecting a package/option, you will be prompted to continue with the available payment methods.

Invoice Management
Users can view their invoice list and details in the account profile:

Invoice Status: Displays payment confirmation for each invoice.
Invoice Details: Shown as below:


>Package Management
Package Management
Go to Packages → Add New Package in the left sidebar to create a new package.

Add a title for your package.
Set up your package in the Package Panel.

Don’t forget to click Publish after setting up.
Administrators can create a new package and also edit, view, or delete any package from the list as shown below:

Invoice Management
Administrators have permission to set the invoice status from Not Paid to Paid after confirming payment from the user. They can also edit or view invoices from the list.

Set the invoice status from Not Paid to Paid after confirming payment from the user.

Transaction Log
Typical web transactions occur when a customer logs in as a member, fills in and submits a web form, or purchases a package. All of these actions are saved into the Transaction Logs.
Administrators can view and edit only the excerpt in the Transaction Log.


Sidebars & Widgets
With Luminor, several sidebar areas are available. Each of these areas is associated with a specific template.

Available sidebar areas:
- Properties Sidebar – for property listing archive pages
- Sidebar Archive Properties – for single property pages
- Sidebar Archive Agent – for agent archive pages
- Sidebar Agency List – for agency archive pages
- Sidebar Blog – for blog and post archives
Blog Post
To Customize Post you go to: Dashboard -> Appearance -> Customize -> Content
-
Blog archive

- Sidebar Position: Select sidebar position on the posts page (No Sidebar/Left/Right)
- Blog Layout: Select layout style for List (List/Grid)
- Post Grid Columns: Choose to display the number of columns of the article
- List Sidebar: In the dropdown box, select the sidebar you want to display on posts page
- Post Content Elements: Drag and drop elements to re-order.
- Post Excepts Length: This option is only available when you turn on "Auto Post Excepts". It uses to limit the content length which is shown on posts page
- Social Share: Enable or disable Social Share
- Read More Text: You can modify the text of Read more button here
- Meta Elements: Drag and drop elements to re-order.
-
Blog Single
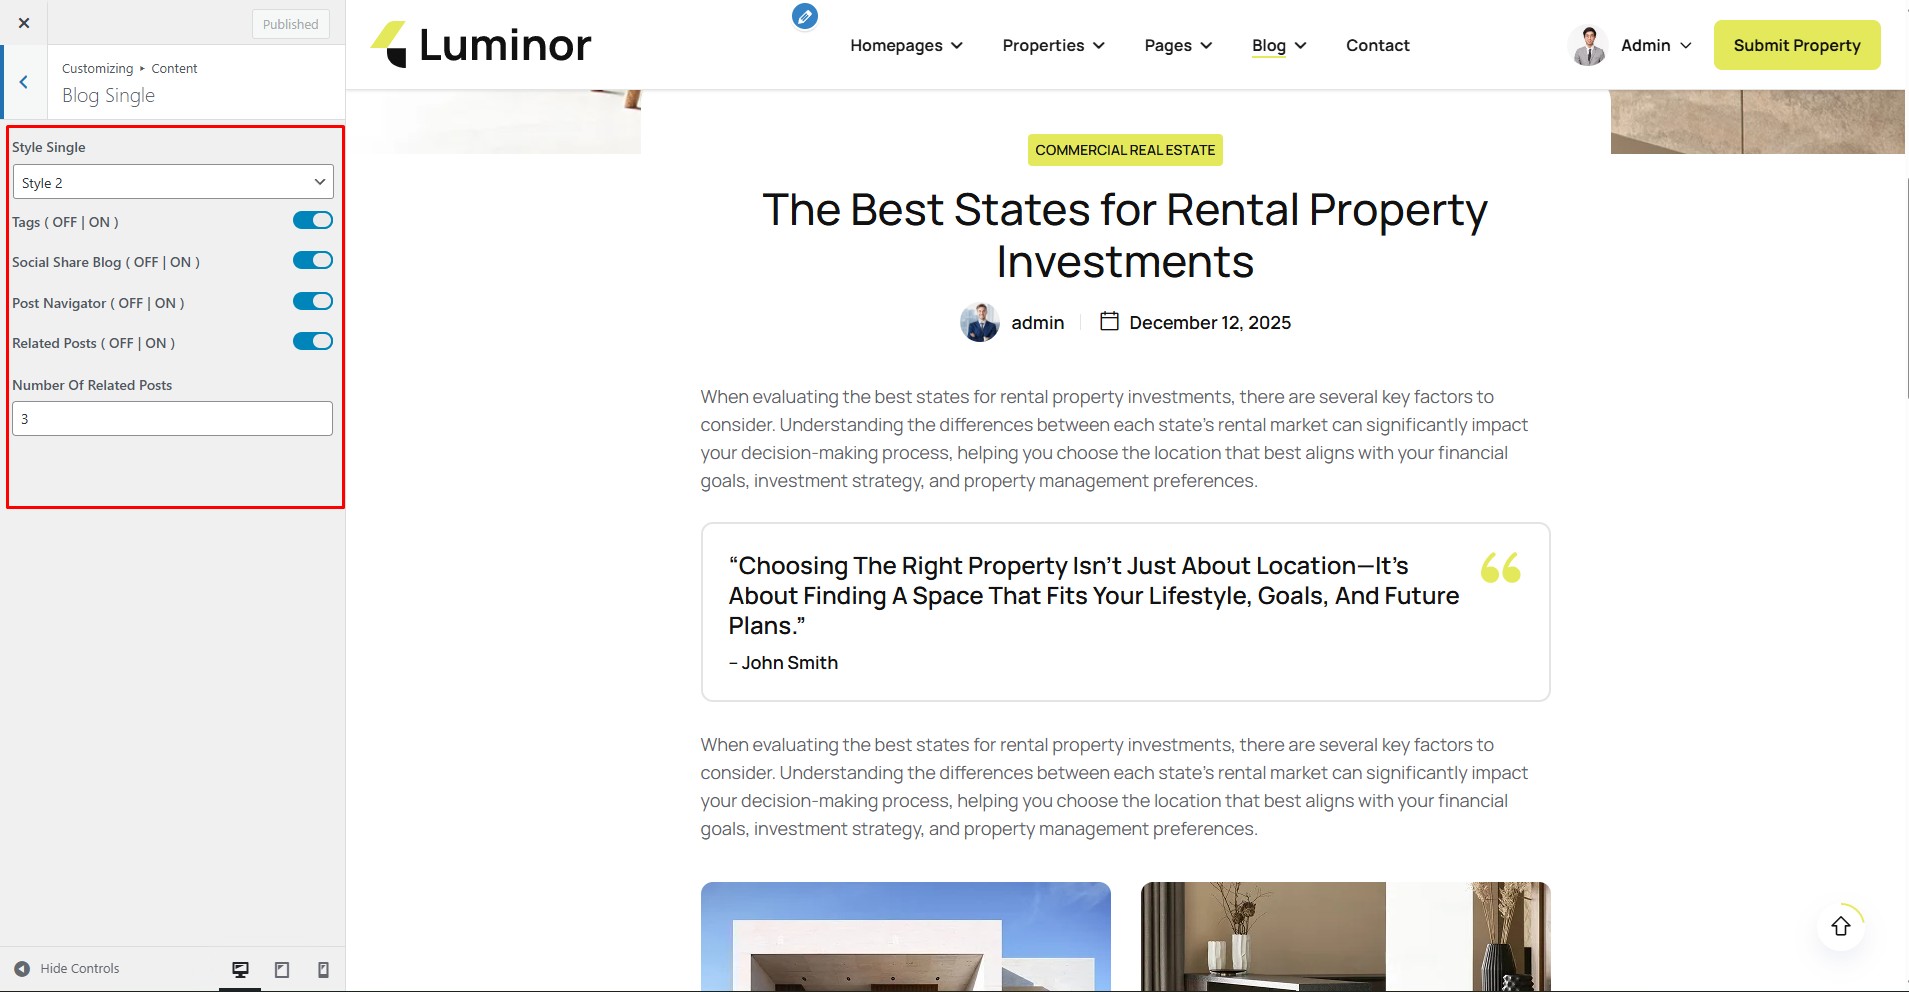
- Post Navigator: Enabled Post Navigator or not
- Related Posts: Enabled Related Posts or not
- Related Posts Style: Choose Related Posts Style (Blog List or Blog Grid)
- Columns Of Related Posts: Choose 2 Columns, 3 Columns, 4 Columns
- Number Of Related Posts: Number Of Related Posts
Themesflat Addons
NOTE: To use all widgets of Themesflat Addons, select the page you want to edit or create a new page, then choose Edit with Elementor → Elementor → Themesflat Addons.

I. Themesflat Addons
-
TF Counter
You can build it using Themesflat Addons.

You can customize it in the Content and Style sections.

-
TF Testimonial Carousel
You can build it using Themesflat Addons.

You can customize it in the Content and Style sections.

-
TF Posts
You can build it using Themesflat Addons.

You can customize it in the Content and Style sections.

-
TF Accordion
You can build it using Themesflat Addons.

You can customize it in the Content and Style sections.

-
TF Price Table
You can build it using Themesflat Addons.

You can customize it in the Content and Style sections.

-
TF Partner
You can build it using Themesflat Addons.

You can customize it in the Content and Style sections.

-
TF Slider
You can build it using Themesflat Addons.

You can customize it in the Content and Style sections.

-
TF About Section
You can build it using Themesflat Addons.

You can customize it in the Content and Style sections.

-
TF Button
You can build it using Themesflat Addons.

You can customize it in the Content and Style sections.

-
TF Features Property
You can build it using Themesflat Addons.

You can customize it in the Content and Style sections.

-
TF Section Process
You can build it using Themesflat Addons.

You can customize it in the Content and Style sections.

-
TF Posts Grid
You can build it using Themesflat Addons.

You can customize it in the Content and Style sections.

-
TF Testimonial List
You can build it using Themesflat Addons.

You can customize it in the Content and Style sections.

-
TF Section Process With Image
You can build it using Themesflat Addons.

You can customize it in the Content and Style sections.

-
TF Group Card Section
You can build it using Themesflat Addons.

You can customize it in the Content and Style sections.

-
TF Call Back Section
You can build it using Themesflat Addons.

You can customize it in the Content and Style sections.

-
TF Icon Box List
You can build it using Themesflat Addons.

You can customize it in the Content and Style sections.

-
TF Section History
You can build it using Themesflat Addons.

You can customize it in the Content and Style sections.

-
TF Posts Load More
You can build it using Themesflat Addons.

You can customize it in the Content and Style sections.

-
TF Career List
You can build it using Themesflat Addons.

You can customize it in the Content and Style sections.

-
TF Tab Content
You can build it using Themesflat Addons.

You can customize it in the Content and Style sections.

-
TF Calculator
You can build it using Themesflat Addons.

You can customize it in the Content and Style sections.

-
TF Counter Section
You can build it using Themesflat Addons.

You can customize it in the Content and Style sections.

-
TF Title Section
You can build it using Themesflat Addons.

You can customize it in the Content and Style sections.

II. Themesflat Real Estate Addons
-
TF Property List
You can build it using Themesflat Real Estate Addons.

You can customize it in the Content and Style sections.

-
TF Properties Masonry Layout
You can build it using Themesflat Real Estate Addons.

You can customize it in the Content and Style sections.

-
TF Agent List
You build it at Themesflat Real Estate Addons

You can customize at Content and Style

-
TF Areas List
You build it at Themesflat Real Estate Addons

You can customize at Content and Style

-
TF Featured Single Property
You build it at Themesflat Real Estate Addons

You can customize at Content and Style

-
TF Properties Style Carousel
You build it at Themesflat Real Estate Addons

You can customize at Content and Style

-
TF Map Property
You build it at Themesflat Real Estate Addons

You can customize at Content and Style

-
TF Search Property
You build it at Themesflat Real Estate Addons

You can customize at Content and Style

There are many more widgets for you to choose, Everything is so simple when you just need drag and drop. Wish you have a great website!
Update Theme
You can easily translate this theme into another language. To make your website work correctly in the chosen language, you need to translate several parts. The easiest way is to use the plugin "Loco Translate". For the Luminor theme, you need to translate the following:
- Theme: Luminor
- Plugin: TF Real Estate
- Theme: Themesflat Core
--- Step-by-step tutorial for translating themes and plugins using "Loco Translate":
Step 1: Install and activate the "Loco Translate" plugin.

Step 2: Select the theme or plugin you want to translate in "Loco Translate".
Step 3: Translate the plugin.

Step 4: Click on the New Language link.

Step 5: Choose a location.

Step 6: Translate the text into the new language.


Step 7: Set the new language.

Step 8: Check the result.

--- Translating Themes: Follow the same steps
How to Use WPML Plugin
Please follow the steps below to install and use the WPML Plugin.
Watch the WPML Plugin Video
Update Plugin: TF Real Estate
Step 1: Deactivate the current "TF Real Estate" plugin.

Step 2: Delete the current "TF Real Estate" plugin.

Step 3: Install the new "TF Real Estate" plugin using the suggested link.

Update Theme: How to Update Your ThemeForest WordPress Theme
For detailed instructions, please visit: Envato Market Plugin Guide